(nothing herein is a paid advertisement, nor am I selling designs or traps)
One of the most indispensable tools for a lepidopterist is their light trap. While collecting at a light sheet is useful (and fun), it does not provide the utility of a trap simply because it is impractical to remain attentive at a sheet for all hours of the night (I’ve only done it a few times!). Any sufficiently designed trap is a force multiplier and will increase your catch 100 fold all while being much easier to deploy in the field. No one could ever catch this many moths at a sheet in one night! (yes that bag is also full)

For years I have purchased and used the bulletproof designs of Leroy Koehn at Leptraps.com. I own a few of his traps and they have spent thousands of hours working overnight for me everywhere I have traveled to collect. If you can afford his traps they are worth it – the vanes are indestructible and the ballasts have an integrated photoelectric switch. The rain drains can also handle a monsoon, although I believe they allow for too much air-circulation and diminish the effect of your killing agent (usually Ethyl Acetate). On the downside Leroy’s traps are bulky and expensive, so not practical to deploy in large numbers. BioQuip does have a more affordable option for a 12 watt DC trap starting at $160, however I do not like their rain drain design, bulb type, nor acrylic vanes; although the bucket can easily be modified if desired.
The quick and easiest trap is just a light on a bucket! No vanes, no strange mechanism – nice and simple. Actually I’ve completely abandoned the use of vanes lately since I notice zero difference with catch results.


But if you’d rather stick to the old vein design here is what I’ve put together for a cheap-er version. Like every other entomologist out there I have tinkered with my own trap design and have attempted to redesign the mousetrap. Here is my proto-prototype vein design. Any advice is welcome, and I would love to see other designs and share them here!

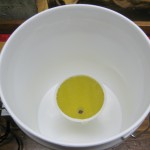
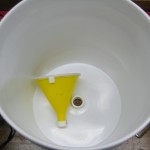
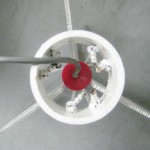
The basic design is two PVC caps that snap onto acrylic vanes – the caps are connected by bungee cords that perfectly hold the vanes in place while allowing for quick and easy assembly and dis-assembly. The vanes then fit tightly in a 10″ funnel held onto the 2 gallon bucket by shortened mini-bungees. Any UV bulb can then be dropped into the vane assembly (in this case a BioQuip light). The diameter of the vane opening at the bottom is slightly narrower than at the top, providing a very snug cavity for the bulb. Cardboard egg cartons or towel padding has to be added to the bucket to provide insect resting area.
Cost: Bucket and vane assembly is $56.37. (w/o tax) – the standard 15w light from BioQuip it is $60.70. Total price is ~$117.
Advantages: Lightweight, small. The only limiting factor is the size of stacked buckets, about 12 traps require the same storage space as 2 rigid built traps. Vanes collapse to be negligible in size, the smaller 2 gallon buckets are better suited to a less-abundant fauna but can be upgraded to 3 1/2 or 5 gallon sizes for appropriate areas (mounting the funnel onto a lid of a larger bucket is all that is required). Broken vanes can be replaced in the field with cardboard or wooden backups can be prepared ahead of time. Cheap!
Disadvantages: Acrylic is not durable enough for long term use, the ideal material would be aluminum. Joints on the acrylic had to be reinforced with strapping tape – thicker acrylic might be better…. The bucket and vanes are so light that it must be staked down in the field. Poorly made by a non-engineer.
Now for more detailed specifications:
Supply list, purchased from your local “mega hardware store”.
2 gallon bucket $3.58
2″ x 2′ PVC pipe $3.69
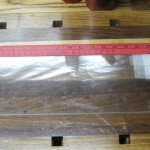
.093 – 20 x 32 Acrylic Sheet $ 13.98 ea (thicker would be better)
10″ funnel (from brewing supply store) $17.98
1/2″ x 2′ PVC $0.99
1/2″ PVC coupling $0.25
mini bungee 8 pack $2.47
fiberglass screen $5.98 – for rain drain
small funnel (from auto-supply store) $1.98
Plastic epoxy $5.47
10′ of 4mm bungee cord – minimum order $20. (left out of total, rope can be used for a cheaper cost)
Tools required:
Dremel tool for cutting grooves in PVC and acrylic
PVC pipe cutter – for both 2″ and 1/2″ pipes.
Acrylic/Plexi cutting knife (helpful video for cutting)
Drill with 13/65 bit for holes
Safety glasses!
Batteries:
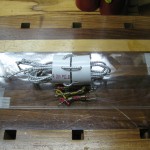
My favorite batteries for powering these 15 watt bulbs are sealed lead acid (SLA). They are smaller, lighter in weight, are FAA approved for air travel, and don’t leak acid all over your car and clothing. They are also pretty cheap. If you explore your local battery suppliers you can usually find these for about $40.
For regular use I use this 18 amp-hour 12V battery: $34.95 before shipping. The 18ah rating provides a full night of light with enough buffer to extend the length of the battery for a few years. The less percentage you can discharge a battery the longer it will last.
For international trips a 14ah battery is better. They are slightly smaller and lighter and will provide about 7 1/2 hours of light before becoming exhausted. Because you are fully discharging the battery they will not last as long.